Push Work to Serverless Computing Infrastructure 
Push work pools are a special type of work pool that allows Prefect Cloud to submit flow runs for execution to serverless computing infrastructure without running a worker. Push work pools currently support execution in AWS ECS tasks, Azure Container Instances, Google Cloud Run jobs, and Modal.
In this guide you will:
- Create a push work pool that sends work to Amazon Elastic Container Service (AWS ECS), Azure Container Instances (ACI), Google Cloud Run, or Modal
- Deploy a flow to that work pool
- Execute a flow without having to run a worker or agent process to poll for flow runs
You can automatically provision infrastructure and create your push work pool using the prefect work-pool create CLI command with the --provision-infra flag.
This approach greatly simplifies the setup process.
Let's explore automatic infrastructure provisioning for push work pools first, and then we'll cover how to manually set up your push work pool.
Automatic infrastructure provisioning
With Perfect Cloud you can provision infrastructure for use with an AWS ECS, Google Cloud Run, ACI push work pool. Push work pools in Prefect Cloud simplify the setup and management of the infrastructure necessary to run your flows. However, setting up infrastructure on your cloud provider can still be a time-consuming process. Prefect can dramatically simplify this process by automatically provisioning the necessary infrastructure for you.
We'll use the prefect work-pool create CLI command with the --provision-infra flag to automatically provision your serverless cloud resources and set up your Prefect workspace to use a new push pool.
Prerequisites
To use automatic infrastructure provisioning, you'll need to have the relevant cloud CLI library installed and to have authenticated with your cloud provider.
Install the AWS CLI, authenticate with your AWS account, and set a default region.
If you already have the AWS CLI installed, be sure to update to the latest version.
You will need the following permissions in your authenticated AWS account:
IAM Permissions:
- iam:CreatePolicy
- iam:GetPolicy
- iam:ListPolicies
- iam:CreateUser
- iam:GetUser
- iam:AttachUserPolicy
- iam:CreateRole
- iam:GetRole
- iam:AttachRolePolicy
- iam:ListRoles
- iam:PassRole
Amazon ECS Permissions:
- ecs:CreateCluster
- ecs:DescribeClusters
Amazon EC2 Permissions:
- ec2:CreateVpc
- ec2:DescribeVpcs
- ec2:CreateInternetGateway
- ec2:AttachInternetGateway
- ec2:CreateRouteTable
- ec2:CreateRoute
- ec2:CreateSecurityGroup
- ec2:DescribeSubnets
- ec2:CreateSubnet
- ec2:DescribeAvailabilityZones
- ec2:AuthorizeSecurityGroupIngress
- ec2:AuthorizeSecurityGroupEgress
Amazon ECR Permissions:
- ecr:CreateRepository
- ecr:DescribeRepositories
- ecr:GetAuthorizationToken
If you want to use AWS managed policies, you can use the following:
- AmazonECS_FullAccess
- AmazonEC2FullAccess
- IAMFullAccess
- AmazonEC2ContainerRegistryFullAccess
Note that the above policies will give you all the permissions needed, but are more permissive than necessary.
Docker is also required to build and push images to your registry. You can install Docker here.
Install the Azure CLI and authenticate with your Azure account.
If you already have the Azure CLI installed, be sure to update to the latest version with az upgrade.
You will also need the following roles in your Azure subscription:
- Contributor
- User Access Administrator
- Application Administrator
- Managed Identity Operator
- Azure Container Registry Contributor
Docker is also required to build and push images to your registry. You can install Docker here.
Install the gcloud CLI and authenticate with your GCP project.
If you already have the gcloud CLI installed, be sure to update to the latest version with gcloud components update.
You will also need the following permissions in your GCP project:
- resourcemanager.projects.list
- serviceusage.services.enable
- iam.serviceAccounts.create
- iam.serviceAccountKeys.create
- resourcemanager.projects.setIamPolicy
- artifactregistry.repositories.create
Docker is also required to build and push images to your registry. You can install Docker here.
Install modal by running:
pip install modal
Create a Modal API token by running:
modal token new
Automatically creating a new push work pool and provisioning infrastructure
Here's the command to create a new push work pool and configure the necessary infrastructure.
prefect work-pool create --type ecs:push --provision-infra my-ecs-pool
Using the --provision-infra flag will automatically set up your default AWS account to be ready to execute flows via ECS tasks.
In your AWS account, this command will create a new IAM user, IAM policy, ECS cluster that uses AWS Fargate, VPC, and ECR repository if they don't already exist.
In your Prefect workspace, this command will create an AWSCredentials block for storing the generated credentials.
Here's an abbreviated example output from running the command:
╭───────────────────────────────────────────────────────────────────────────────────────────────────────────────────╮
│ Provisioning infrastructure for your work pool my-ecs-pool will require:                                          │
│                                                                                                                   │
│          - Creating an IAM user for managing ECS tasks: prefect-ecs-user                                          │
│          - Creating and attaching an IAM policy for managing ECS tasks: prefect-ecs-policy                        │
│          - Storing generated AWS credentials in a block                                                           │
│          - Creating an ECS cluster for running Prefect flows: prefect-ecs-cluster                                 │
│          - Creating a VPC with CIDR 172.31.0.0/16 for running ECS tasks: prefect-ecs-vpc                          │
│          - Creating an ECR repository for storing Prefect images: prefect-flows                                   │
╰───────────────────────────────────────────────────────────────────────────────────────────────────────────────────╯
Proceed with infrastructure provisioning? [y/n]: y
Provisioning IAM user
Creating IAM policy
Generating AWS credentials
Creating AWS credentials block
Provisioning ECS cluster
Provisioning VPC
Creating internet gateway
Setting up subnets
Setting up security group
Provisioning ECR repository
Authenticating with ECR
Setting default Docker build namespace
Provisioning Infrastructure ━━━━━━━━━━━━━━━━━━━━━━━━━━━━━━━━━━━━━━━━ 100% 0:00:00
Infrastructure successfully provisioned!
Created work pool 'my-ecs-pool'!
Default Docker build namespace
After infrastructure provisioning completes, you will be logged into your new ECR repository and the default Docker build namespace will be set to the URL of the registry.
While the default namespace is set, you will not need to provide the registry URL when building images as part of your deployment process.
To take advantage of this, you can write your deploy scripts like this:
from prefect import flow
from prefect.deployments import DeploymentImage

@flow(log_prints=True)
def my_flow(name: str = "world"):
    print(f"Hello {name}! I'm a flow running in a ECS task!")


if __name__ == "__main__":
    my_flow.deploy(
        name="my-deployment",
        work_pool_name="my-work-pool",
        image=DeploymentImage(
            name="my-repository:latest",
            platform="linux/amd64",
        )
    )
This will build an image with the tag <ecr-registry-url>/my-image:latest and push it to the registry.
Your image name will need to match the name of the repository created with your work pool. You can create new repositories in the ECR console.
prefect work-pool create --type azure-container-instance:push --provision-infra my-aci-pool
Using the --provision-infra flag will automatically set up your default Azure account to be ready to execute flows via Azure Container Instances.
In your Azure account, this command will create a resource group, app registration, service account with necessary permission, generate a secret for the app registration, and create an Azure Container Registry, if they don't already exist.
In your Prefect workspace, this command will create an AzureContainerInstanceCredentials block for storing the client secret value from the generated secret.
Here's an abbreviated example output from running the command:
╭───────────────────────────────────────────────────────────────────────────────────────────╮
│ Provisioning infrastructure for your work pool my-aci-work-pool will require:                     │
│                                                                                           │
│     Updates in subscription Azure subscription 1                                          │
│                                                                                           │
│         - Create a resource group in location eastus                                      │
│         - Create an app registration in Azure AD prefect-aci-push-pool-app                │
│         - Create/use a service principal for app registration                             │
│         - Generate a secret for app registration                                          │
│         - Create an Azure Container Registry with prefix prefect                          │
│         - Create an identity prefect-acr-identity to allow access to the created registry │
│         - Assign Contributor role to service account                                      │
│         - Create an ACR registry for image hosting                                        │
│         - Create an identity for Azure Container Instance to allow access to the registry │
│                                                                                           │
│     Updates in Prefect workspace                                                          │
│                                                                                           │
│         - Create Azure Container Instance credentials block aci-push-pool-credentials     │
│                                                                                           │
╰───────────────────────────────────────────────────────────────────────────────────────────╯
Proceed with infrastructure provisioning? [y/n]:
Creating resource group
Creating app registration
Generating secret for app registration
Creating ACI credentials block
ACI credentials block 'aci-push-pool-credentials' created in Prefect Cloud
Assigning Contributor role to service account
Creating Azure Container Registry
Creating identity
Provisioning infrastructure... ━━━━━━━━━━━━━━━━━━━━━━━━━━━━━━━━━━━━━━━━ 100% 0:00:00
Infrastructure successfully provisioned for 'my-aci-work-pool' work pool!
Created work pool 'my-aci-work-pool'!
Default Docker build namespace
After infrastructure provisioning completes, you will be logged into your new Azure Container Registry and the default Docker build namespace will be set to the URL of the registry.
While the default namespace is set, any images you build without specifying a registry or username/organization will be pushed to the registry.
To take advantage of this functionality, you can write your deploy scripts like this:
from prefect import flow
from prefect.deployments import DeploymentImage


@flow(log_prints=True)
def my_flow(name: str = "world"):
    print(f"Hello {name}! I'm a flow running on an Azure Container Instance!")


if __name__ == "__main__":
    my_flow.deploy(
        name="my-deployment",
        work_pool_name="my-work-pool",
        image=DeploymentImage(
            name="my-image:latest",
            platform="linux/amd64",
        )
    )
This will build an image with the tag <acr-registry-url>/my-image:latest and push it to the registry.
prefect work-pool create --type cloud-run:push --provision-infra my-cloud-run-pool
Using the --provision-infra flag will allow you to select a GCP project to use for your work pool and automatically configure it to be ready to execute flows via Cloud Run.
In your GCP project, this command will activate the Cloud Run API, create a service account, and create a key for the service account, if they don't already exist.
In your Prefect workspace, this command will create a GCPCredentials block for storing the service account key.
Here's an abbreviated example output from running the command:
╭──────────────────────────────────────────────────────────────────────────────────────────────────────────╮
│ Provisioning infrastructure for your work pool my-cloud-run-pool will require:                           │
│                                                                                                          │
│     Updates in GCP project central-kit-405415 in region us-central1                                      │
│                                                                                                          │
│         - Activate the Cloud Run API for your project                                                    │
│         - Activate the Artifact Registry API for your project                                            │
│         - Create an Artifact Registry repository named prefect-images                                    │
│         - Create a service account for managing Cloud Run jobs: prefect-cloud-run                        │
│             - Service account will be granted the following roles:                                       │
│                 - Service Account User                                                                   │
│                 - Cloud Run Developer                                                                    │
│         - Create a key for service account prefect-cloud-run                                             │
│                                                                                                          │
│     Updates in Prefect workspace                                                                         │
│                                                                                                          │
│         - Create GCP credentials block my--pool-push-pool-credentials to store the service account key   │
│                                                                                                          │
╰──────────────────────────────────────────────────────────────────────────────────────────────────────────╯
Proceed with infrastructure provisioning? [y/n]: y
Activating Cloud Run API
Activating Artifact Registry API
Creating Artifact Registry repository
Configuring authentication to Artifact Registry
Setting default Docker build namespace
Creating service account
Assigning roles to service account
Creating service account key
Creating GCP credentials block
Provisioning Infrastructure ━━━━━━━━━━━━━━━━━━━━━━━━━━━━━━━━━━━━━━━━ 100% 0:00:00
Infrastructure successfully provisioned!
Created work pool 'my-cloud-run-pool'!
Default Docker build namespace
After infrastructure provisioning completes, you will be logged into your new Artifact Registry repository and the default Docker build namespace will be set to the URL of the repository.
While the default namespace is set, any images you build without specifying a registry or username/organization will be pushed to the repository.
To take advantage of this functionality, you can write your deploy scripts like this:
from prefect import flow
from prefect.deployments import DeploymentImage


@flow(log_prints=True)
def my_flow(name: str = "world"):
    print(f"Hello {name}! I'm a flow running on Cloud Run!")


if __name__ == "__main__":
    my_flow.deploy(
        name="my-deployment",
        work_pool_name="above-ground",
        image=DeploymentImage(
            name="my-image:latest",
            platform="linux/amd64",
        )
    )
This will build an image with the tag <region>-docker.pkg.dev/<project>/<repository-name>/my-image:latest and push it to the repository.
prefect work-pool create --type modal:push --provision-infra my-modal-pool
Using the --provision-infra flag will trigger the creation of a ModalCredentials block in your Prefect Cloud workspace. This block will store your Modal API token, which is used to authenticate with Modal's API. By default, the token for your current Modal profile will be used for the new ModalCredentials block. If Prefect is unable to discover a Modal API token for your current profile, you will be prompted to create a new one.
That's it! You're ready to create and schedule deployments that use your new push work pool. Reminder that no worker is needed to run flows with a push work pool.
Using existing resources with automatic infrastructure provisioning
If you already have the necessary infrastructure set up, Prefect will detect that upon work pool creation and the infrastructure provisioning for that resource will be skipped.
For example, here's how prefect work-pool create my-work-pool --provision-infra looks when existing Azure resources are detected:
Proceed with infrastructure provisioning? [y/n]: y
Creating resource group
Resource group 'prefect-aci-push-pool-rg' already exists in location 'eastus'.
Creating app registration
App registration 'prefect-aci-push-pool-app' already exists.
Generating secret for app registration
Provisioning infrastructure
ACI credentials block 'bb-push-pool-credentials' created
Assigning Contributor role to service account...
Service principal with object ID '4be6fed7-...' already has the 'Contributor' role assigned in
'/subscriptions/.../'
Creating Azure Container Instance
Container instance 'prefect-aci-push-pool-container' already exists.
Creating Azure Container Instance credentials block
Provisioning infrastructure... ━━━━━━━━━━━━━━━━━━━━━━━━━━━━━━━━━━━━━━━━ 100% 0:00:00
Infrastructure successfully provisioned!
Created work pool 'my-work-pool'!
Provisioning infrastructure for an existing push work pool
If you already have a push work pool set up, but haven't configured the necessary infrastructure, you can use the provision-infra sub-command to provision the infrastructure for that work pool.
For example, you can run the following command if you have a work pool named "my-work-pool".
prefect work-pool provision-infra my-work-pool
Prefect will create the necessary infrastructure for the my-work-pool work pool and provide you with a summary of the changes to be made:
╭────────────────────────────────────────────────────────────────────────────────────────────────────────────────╮
│ Provisioning infrastructure for your work pool my-work-pool will require:                                      │
│                                                                                                                │
│     Updates in subscription Azure subscription 1                                                               │
│                                                                                                                │
│         - Create a resource group in location eastus                                                           │
│         - Create an app registration in Azure AD prefect-aci-push-pool-app                                     │
│         - Create/use a service principal for app registration                                                  │
│         - Generate a secret for app registration                                                               │
│         - Assign Contributor role to service account                                                           │
│         - Create Azure Container Instance 'aci-push-pool-container' in resource group prefect-aci-push-pool-rg │
│                                                                                                                │
│     Updates in Prefect workspace                                                                               │
│                                                                                                                │
│         - Create Azure Container Instance credentials block aci-push-pool-credentials                          │
│                                                                                                                │
╰────────────────────────────────────────────────────────────────────────────────────────────────────────────────╯
Proceed with infrastructure provisioning? [y/n]: y
This command can speed up your infrastructure setup process.
As with the examples above, you will need to have the related cloud CLI library installed and be authenticated with your cloud provider.
Manual infrastructure provisioning
If you prefer to set up your infrastructure manually, don't include the --provision-infra flag in the CLI command.
In the examples below, we'll create a push work pool via the Prefect Cloud UI.
To push work to ECS, AWS credentials are required.
Create a user and attach the AmazonECS_FullAccess permissions.
From that user's page create credentials and store them somewhere safe for use in the next section.
To push work to Azure, an Azure subscription, resource group and tenant secret are required.
Create Subscription and Resource Group
- In the Azure portal, create a subscription.
- Create a resource group within your subscription.
Create App Registration
- In the Azure portal, create an app registration.
- In the app registration, create a client secret. Copy the value and store it somewhere safe.
Add App Registration to Resource Group
- Navigate to the resource group you created earlier.
- Choose the "Access control (IAM)" blade in the left-hand side menu. Click "+ Add" button at the top, then "Add role assignment".
- Go to the "Privileged administrator roles" tab, click on "Contributor", then click "Next" at the bottom of the page.
- Click on "+ Select members". Type the name of the app registration (otherwise it may not autopopulate) and click to add it. Then hit "Select" and click "Next". The default permissions associated with a role like "Contributor" might not always be sufficient for all operations related to Azure Container Instances (ACI). The specific permissions required can depend on the operations you need to perform (like creating, running, and deleting ACI container groups) and your organization's security policies. In some cases, additional permissions or custom roles might be necessary.
- Click "Review + assign" to finish.
A GCP service account and an API Key are required, to push work to Cloud Run.
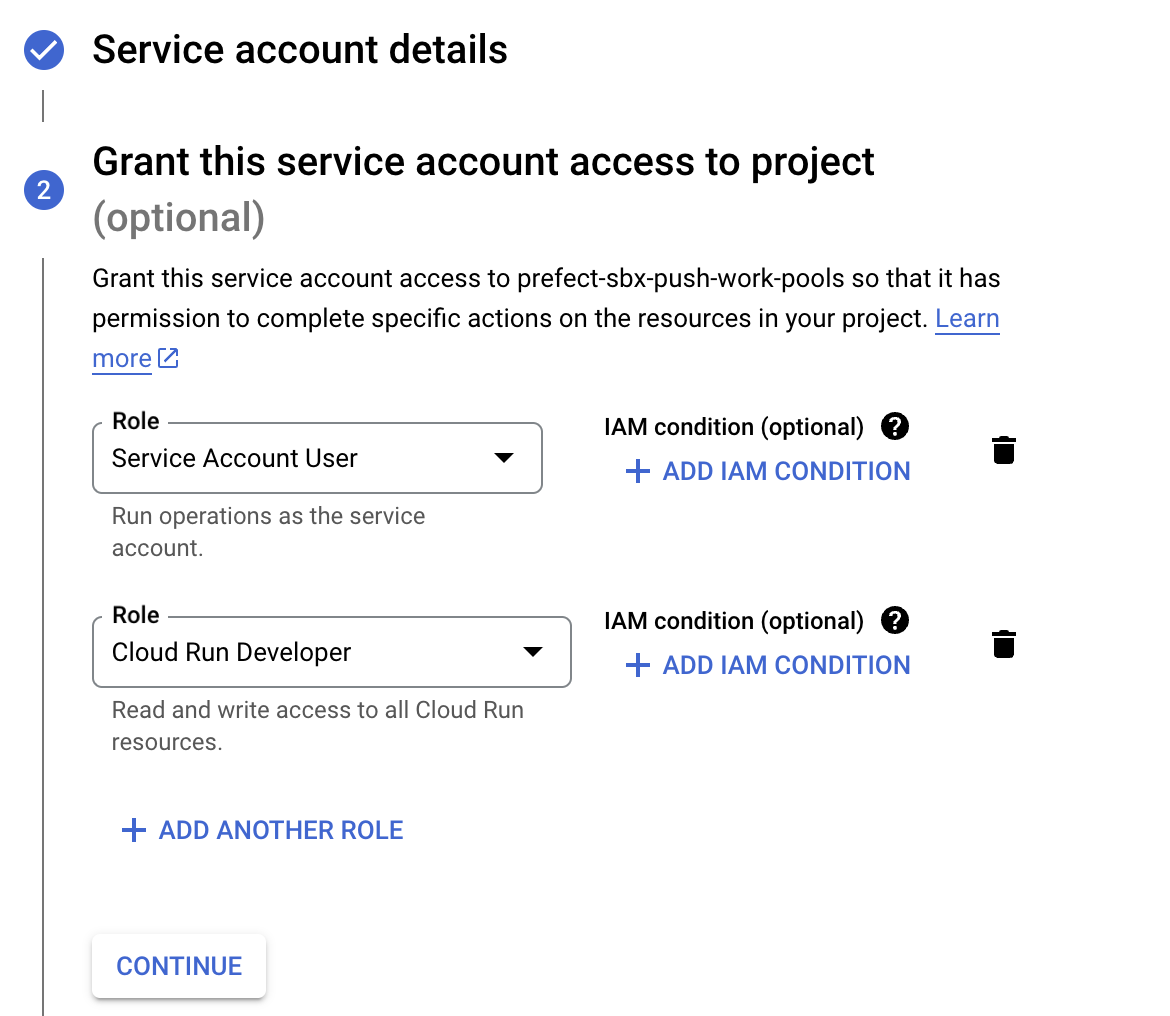
Create a service account by navigating to the service accounts page and clicking Create. Name and describe your service account, and click continue to configure permissions.
The service account must have two roles at a minimum, Cloud Run Developer, and Service Account User.
Once the Service account is created, navigate to its Keys page to add an API key. Create a JSON type key, download it, and store it somewhere safe for use in the next section.
A Modal API token is required to push work to Modal.
Create a Modal API token by navigating to Settings in the Modal UI. In the API Tokens section of the Settings page, click New Token.
Copy the token ID and token secret and store them somewhere safe for use in the next section.
Work pool configuration
Our push work pool will store information about what type of infrastructure our flow will run on, what default values to provide to compute jobs, and other important execution environment parameters. Because our push work pool needs to integrate securely with your serverless infrastructure, we need to start by storing our credentials in Prefect Cloud, which we'll do by making a block.
Creating a Credentials block
Navigate to the blocks page, click create new block, and select AWS Credentials for the type.
For use in a push work pool, region, access key, and access key secret must be set.
Provide any other optional information and create your block.
Navigate to the blocks page and click the "+" at the top to create a new block. Find the Azure Container Instance Credentials block and click "Add +".
Locate the client ID and tenant ID on your app registration and use the client secret you saved earlier. Be sure to use the value of the secret, not the secret ID!
Provide any other optional information and click "Create".
Navigate to the blocks page, click create new block, and select GCP Credentials for the type.
For use in a push work pool, this block must have the contents of the JSON key stored in the Service Account Info field, as such:
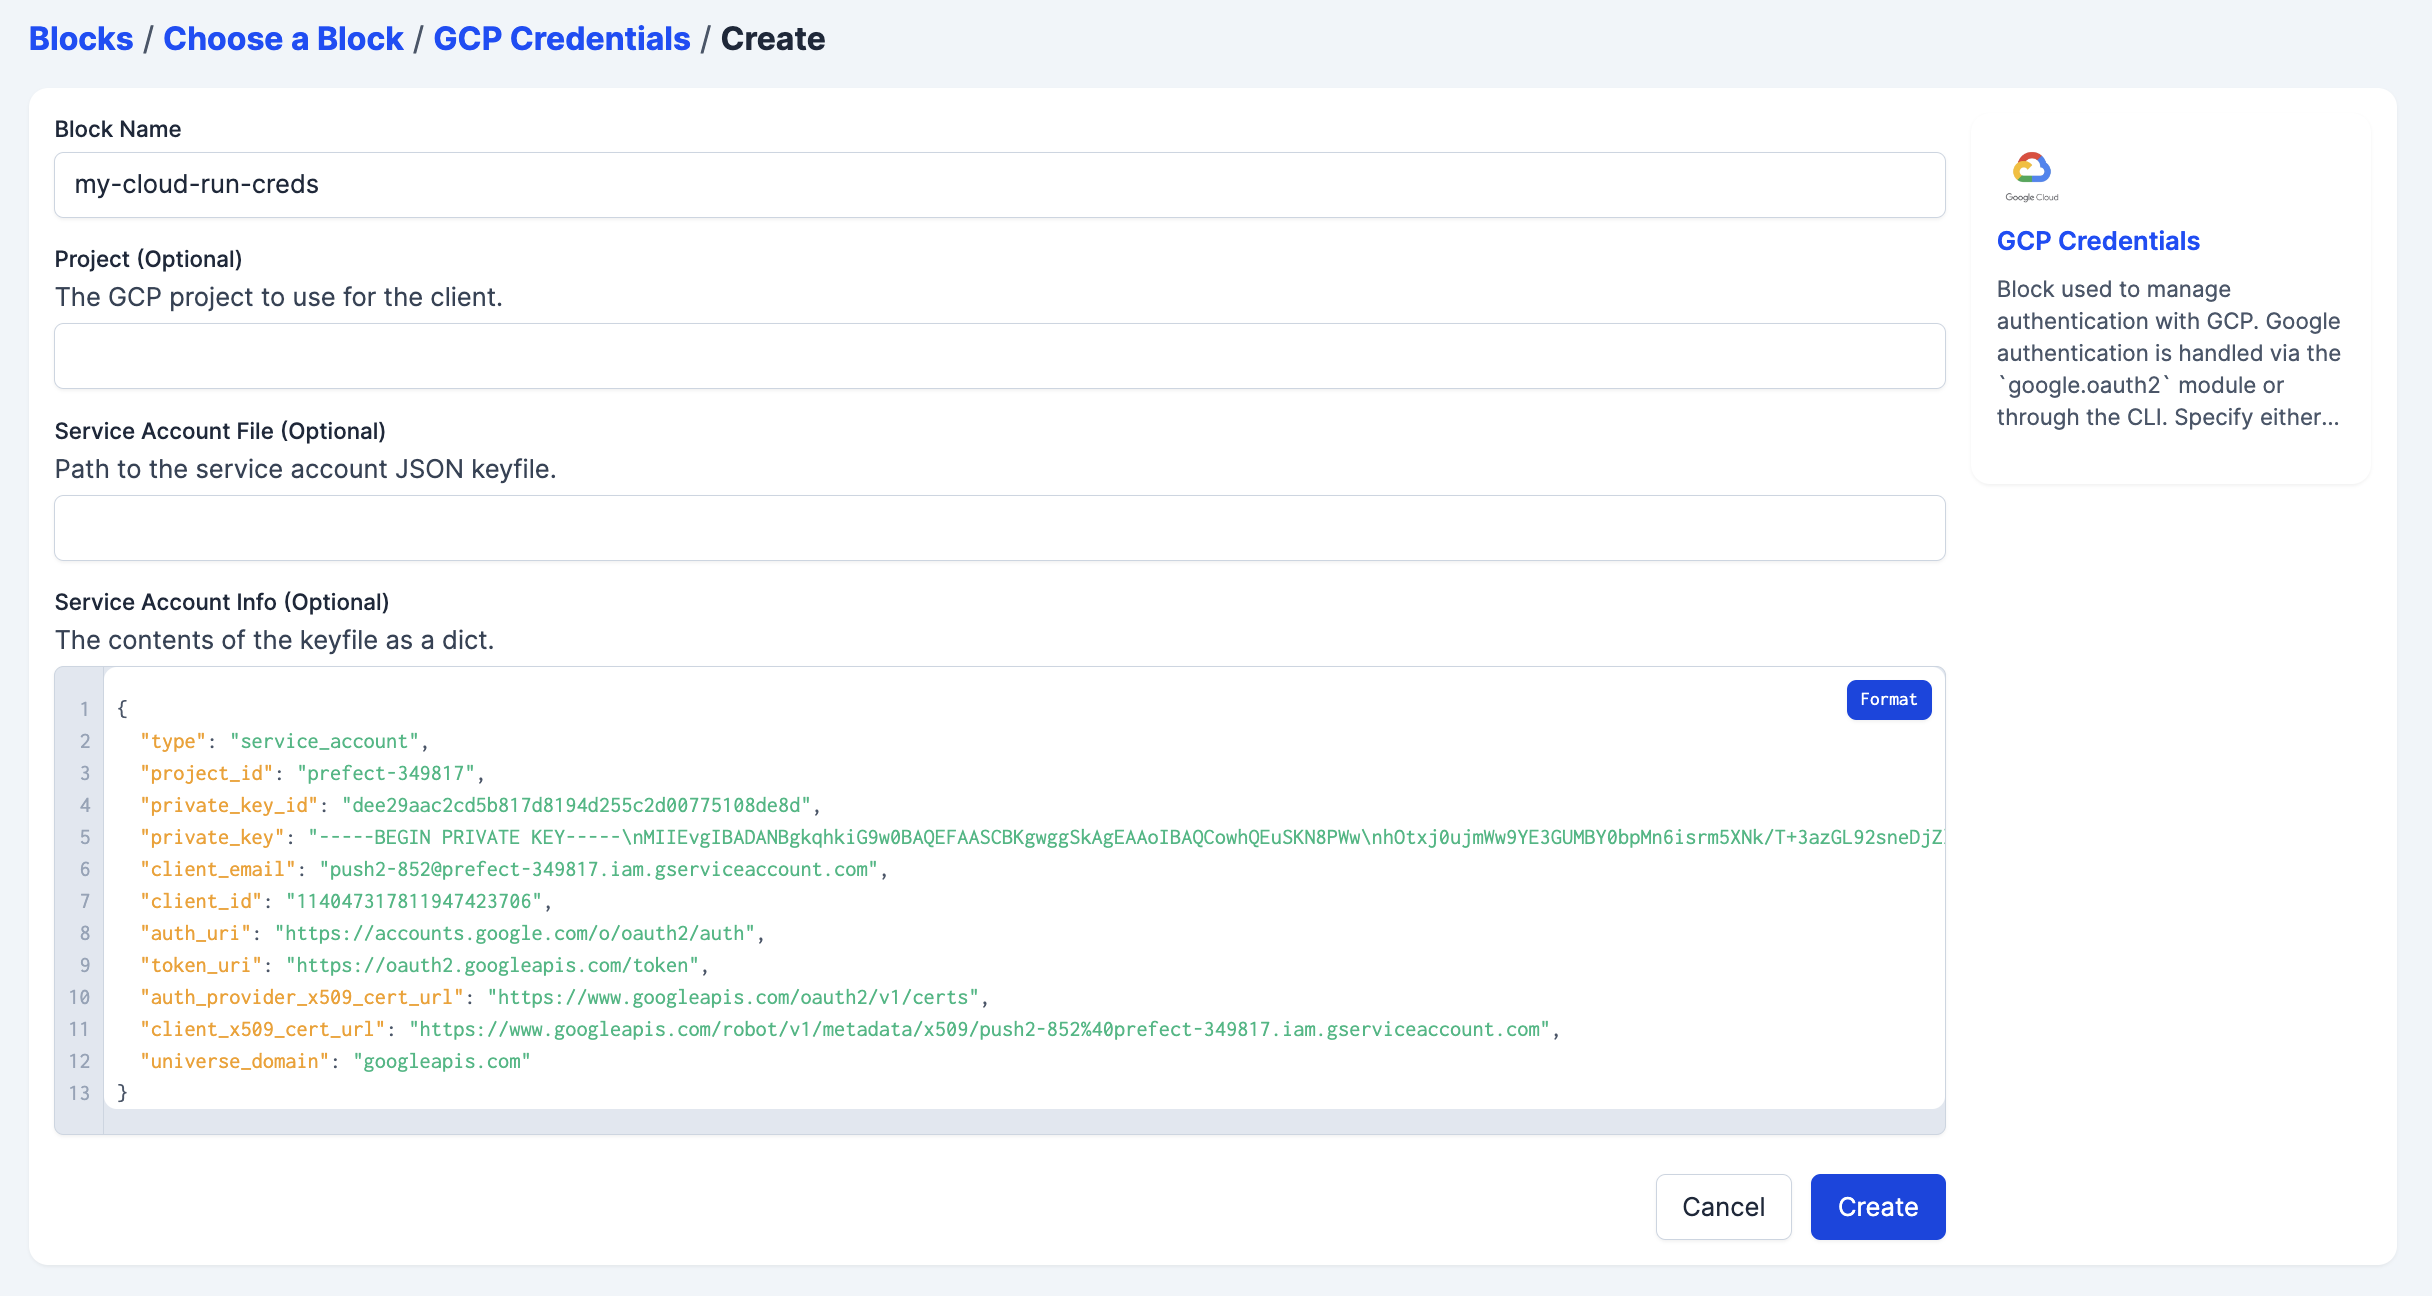
Provide any other optional information and create your block.
Navigate to the blocks page, click create new block, and select Modal Credentials for the type.
For use in a push work pool, this block must have the token ID and token secret stored in the Token ID and Token Secret fields, respectively.
Creating a push work pool
Now navigate to the work pools page. Click Create to start configuring your push work pool by selecting a push option in the infrastructure type step.
Each step has several optional fields that are detailed in the work pools documentation. Select the block you created under the AWS Credentials field. This will allow Prefect Cloud to securely interact with your ECS cluster.
Fill in the subscription ID and resource group name from the resource group you created.
Add the Azure Container Instance Credentials block you created in the step above.
Each step has several optional fields that are detailed in the work pools documentation. Select the block you created under the GCP Credentials field. This will allow Prefect Cloud to securely interact with your GCP project.
Each step has several optional fields that are detailed in the work pools documentation. Select the block you created under the Modal Credentials field. This will allow Prefect Cloud to securely interact with your Modal account.
Create your pool and you are ready to deploy flows to your Push work pool.
Deployment
Deployment details are described in the deployments concept section.
Your deployment needs to be configured to send flow runs to our push work pool.
For example, if you create a deployment through the interactive command line experience, choose the work pool you just created. If you are deploying an existing prefect.yaml file, the deployment would contain:
  work_pool:
    name: my-push-pool
Deploying your flow to the my-push-pool work pool will ensure that runs that are ready for execution will be submitted immediately, without the need for a worker to poll for them.
Serverless infrastructure may require a certain image architecture
Note that serverless infrastructure may assume a certain Docker image architecture; for example, Google Cloud Run will fail to run images built with linux/arm64 architecture. If using Prefect to build your image, you can change the image architecture through the platform keyword (e.g., platform="linux/amd64").
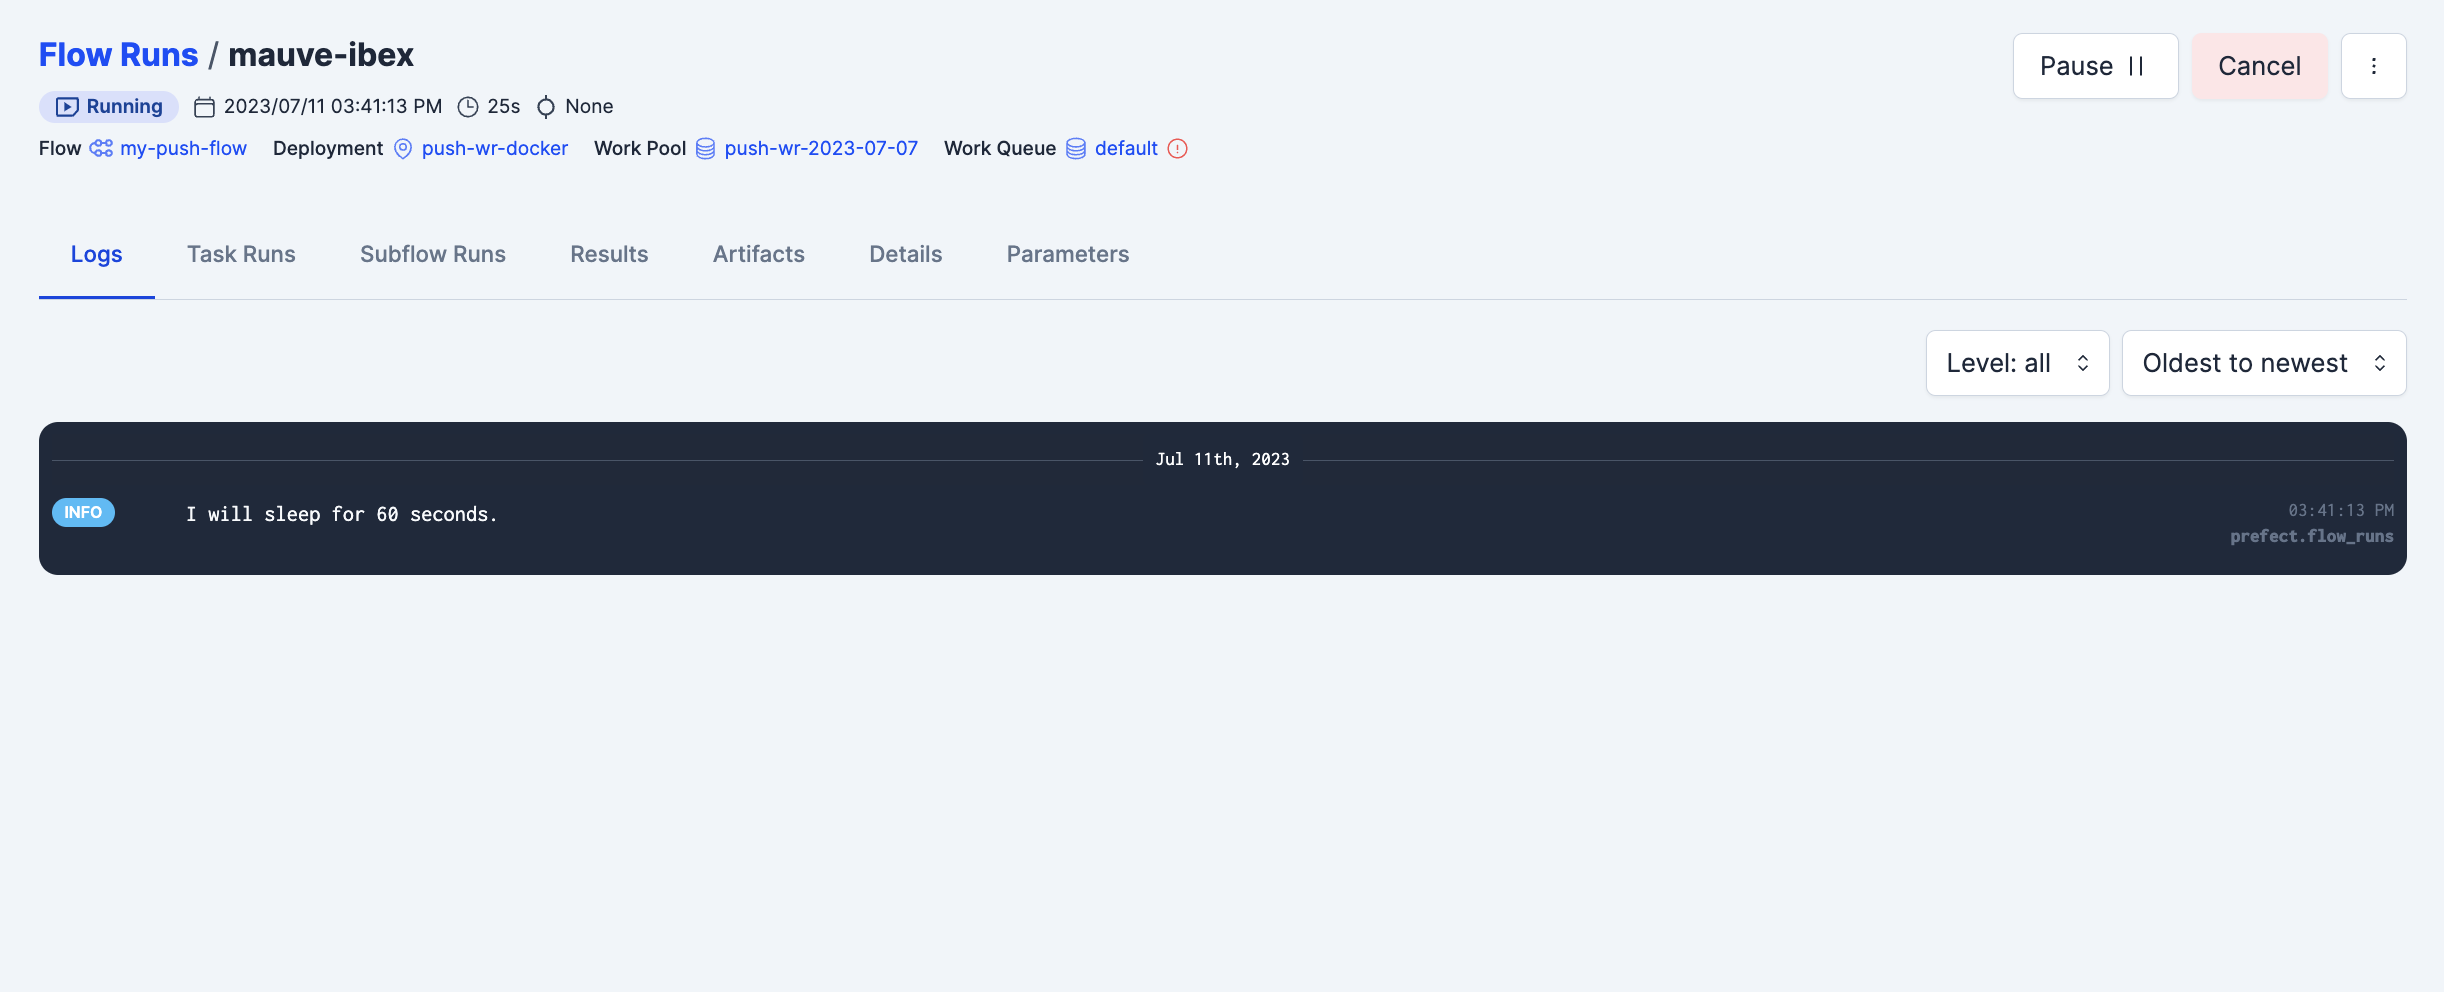
Putting it all together
With your deployment created, navigate to its detail page and create a new flow run. You'll see the flow start running without ever having to poll the work pool, because Prefect Cloud securely connected to your serverless infrastructure, created a job, ran the job, and began reporting on its execution.
Next steps
Learn more about workers and work pools in the Prefect concept documentation.
Learn about installing dependencies at runtime or baking them into your Docker image in the Deploying Flows to Work Pools and Workers guide.